不管喜欢与否,javascript无处不在。 我们可以在客户端的前台应用中找到它,也可以在大量的框架、类库中找到它,而且可以在服务器端的后台应用中找到它。
近年来, Javascript越来越流行,这似乎是由于 Javascript 生态系统正在帮助提高生产率、减少入门所需的时间。 在我的第一篇文章中,我介绍了使用 ASP.NET Web 后端 API 实现 G级文件上传,发表完这篇文章后,我决定试一下使用 Node.js 能否达到同样的效果。 这意味着我需要实现 UploadChunk和 MergeAll方法,在 Node.js中我发表的 最后一篇文章谈到了这一点。
开发环境
我们将使用 Visual Studio Express 2013 for Web 作为开发环境, 不过它还不能被用来做 Node.js 开发。为此我们需要安装 Node.js Tools for Visual Studio。 装好后 Visual Studio Express 2013 for Web 就会转变成一个 Node.js IDE 环境,提供创建这个应用所需要的所有东西.。而基于这里提供的指导,我们需要:
- 下载安装 Node.js Windows 版,选择适用你系统平台的版本, Node.js (x86) 或者 Node.js (x64)。
- 下载并安装 Node.js 的 Visual Studio 工具。
安装完成后我们就会运行 Visual Studio Express 2013 for Web, 并使用 Node.js 的交互窗口来验证安装. Node.js 的交互窗口可以再 View->Other Windows->Node.js Interactive Window 下找到. Node.js 交互窗口运行后我们要输入一些命令检查是否一切OK.

Figure 1 Node.js Interactive Window
现在我们已经对安装进行了验证,我们现在就可以准备开始创建支持GB级文件上传的Node.js后台程序了. 开始我们先创建一个新的项目,并选择一个空的 Node.js Web应用程序模板.

Figure 2 New project using the Blank Node.js Web Application template
项目创建好以后,我们应该会看到一个叫做 server.js 的文件,还有解决方案浏览器里面的Node包管理器 (npm).

图3 解决方案管理器里面的 Node.js 应用程序
server.js 文件里面有需要使用Node.js来创建一个基础的hello world应用程序的代码.
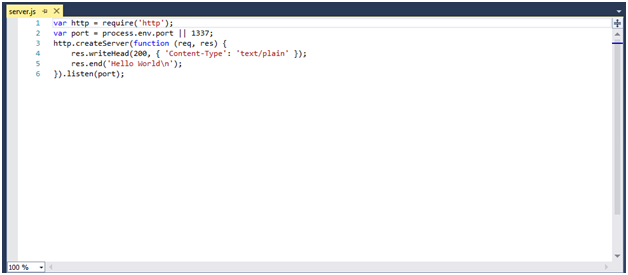
Figure 4 The Hello World application
我现在继续把这段代码从 server.js 中删除,然后在Node.js中穿件G级别文件上传的后端代码。下面我需要用npm安装这个项目需要的一些依赖:
- Express – Node.js网页应用框架,用于构建单页面、多页面以及混合网络应用
- Formidable – 用于解析表单数据,特别是文件上传的Node.js模块
- fs-extra – 文件系统交互模块
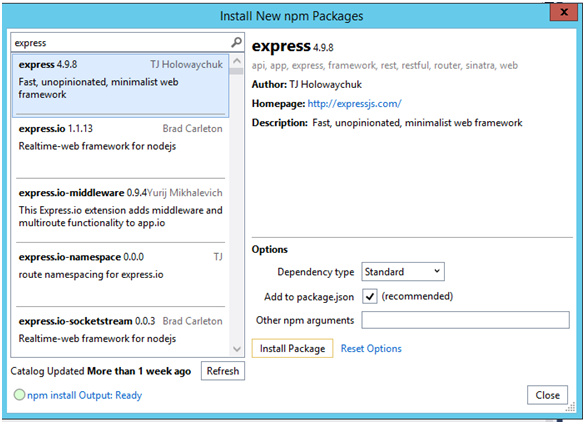
图5 使用npm安装所需模块
模块安装完成后,我们可以从解决方案资源管理器中看到它们。

下一步我们需要在解决方案资源管理器新建一个 ”Scripts” 文件夹并且添加 ”workeruploadchunk.js” 和 “workerprocessfile.js” 到该文件夹。我们还需要下载 jQuery 2.x 和 SparkMD5 库并添加到”Scripts”文件夹。 最后还需要添加 ”Default.html” 页面。这些都在我之前的 post 中介绍过。
创建Node.js后台
首先我们需要用Node.js的”require()”函数来导入在后台上传G级文件的模块。注意我也导入了”path”以及”crypto” 模块。”path”模块提供了生成上传文件块的文件名的方法。”crypto” 模块提供了生成上传文件的MD5校验和的方法。
// The required modules
var   express = require('express');
var   formidable = require('formidable');
var   fs = require('fs-extra');
var   path = require('path');
var   crypto = require('crypto');
下一行代码就是见证奇迹的时刻。
var app = express();
这行代码是用来创建express应用的。express应用是一个封装了Node.js底层功能的中间件。如果你还记得那个由Blank Node.js Web应用模板创建的”Hello World” 程序,你会发现我导入了”http”模块,然后调用了”http.CreateServer()”方法创建了 ”Hello World” web应用。我们刚刚创建的express应用内建了所有的功能。
现在我们已经创建了一个express应用,我们让它呈现之前创建的”Default.html”,然后让应用等待连接。
// Serve up the Default.html page
app.use(express.static(__dirname, { index: 'Default.html' }));

// Startup the express.js application
app.listen(process.env.PORT || 1337);

// Path to save the files
var   uploadpath = 'C:/Uploads/CelerFT/';
express应用有app.VERB()方法,它提供了路由的功能。我们将使用app.post()方法来处理”UploadChunk” 请求。在app.post()方法里我们做的第一件事是检查我们是否在处理POST请求。接下去检查Content-Type是否是mutipart/form-data,然后检查上传的文件块大小不能大于51MB。
// Use the post method for express.js to respond to posts to the uploadchunk urls and
// save each file chunk as a separate file
app.post('*/api/CelerFTFileUpload/UploadChunk*', function(request,response) {

    if (request.method === 'POST') {
        // Check Content-Type
        if (!(request.is('multipart/form-data'))){
            response.status(415).send('Unsupported media type');
            return;
        }

        // Check that we have not exceeded the maximum chunk upload size
        var maxuploadsize =51 * 1024 * 1024;

        if (request.headers['content-length']> maxuploadsize){
            response.status(413).send('Maximum upload chunk size exceeded');
            return;
        }
一旦我们成功通过了所有的检查,我们将把上传的文件块作为一个单独分开的文件并将它按顺序数字命名。下面最重要的代码是调用fs.ensureDirSync()方法,它使用来检查临时目录是否存在。如果目录不存在则创建一个。注意我们使用的是该方法的同步版本。
// Get the extension from the file name
var extension =path.extname(request.param('filename'));

// Get the base file name
var baseFilename =path.basename(request.param('filename'), extension);

// Create the temporary file name for the chunk
var tempfilename =baseFilename + '.'+
request.param('chunkNumber').toString().padLeft('0', 16) + extension + ".tmp";

// Create the temporary directory to store the file chunk
// The temporary directory will be based on the file name
var tempdir =uploadpath + request.param('directoryname')+ '/' + baseFilename;

// The path to save the file chunk
var localfilepath =tempdir + '/'+ tempfilename;

if (fs.ensureDirSync(tempdir)) {
    console.log('Created directory ' +tempdir);
}
正如我之前提出的,我们可以通过两种方式上传文件到后端服务器。第一种方式是在web浏览器中使用FormData,然后把文件块作为二进制数据发送,另一种方式是把文件块转换成base64编码的字符串,然后创建一个手工的multipart/form-data encoded请求,然后发送到后端服务器。
所以我们需要检查一下是否在上传的是一个手工multipart/form-data encoded请求,通过检查”CelerFT-Encoded”头部信息,如果这个头部存在,我们创建一个buffer并使用request的ondata时间把数据拷贝到buffer中。
在request的onend事件中通过将buffer呈现为字符串并按CRLF分开,从而从 multipart/form-data encoded请求中提取base64字符串。base64编码的文件块可以在数组的第四个索引中找到。
通过创建一个新的buffer来将base64编码的数据重现转换为二进制。随后调用fs.outputFileSync()方法将buffer写入文件中。
// Check if we have uploaded a hand crafted multipart/form-data request
// If we have done so then the data is sent as a base64 string
// and we need to extract the base64 string and save it
if (request.headers['celerft-encoded']=== 'base64') {

    var fileSlice = newBuffer(+request.headers['content-length']);
    var bufferOffset = 0;

    // Get the data from the request
    request.on('data', function (chunk) {
        chunk.copy(fileSlice , bufferOffset);
        bufferOffset += chunk.length;
    }).on('end', function() {
        // Convert the data from base64 string to binary
        // base64 data in 4th index of the array
        var base64data = fileSlice.toString().split('\r\n');
        var fileData = newBuffer(base64data[4].toString(), 'base64');

        fs.outputFileSync(localfilepath,fileData);
        console.log('Saved file to ' +localfilepath);

        // Send back a sucessful response with the file name
        response.status(200).send(localfilepath);
        response.end();
    });
}
二进制文件块的上传是通过formidable模块来处理的。我们使用formidable.IncomingForm()方法得到multipart/form-data encoded请求。formidable模块将把上传的文件块保存为一个单独的文件并保存到临时目录。我们需要做的是在formidable的onend事件中将上传的文件块保存为里一个名字。
else {
    // The data is uploaded as binary data.
    // We will use formidable to extract the data and save it
    var form = new formidable.IncomingForm();
    form.keepExtensions = true;
    form.uploadDir = tempdir;

    // Parse the form and save the file chunks to the
    // default location
    form.parse(request, function (err, fields, files) {
        if (err){
            response.status(500).send(err);
            return;
        }

    //console.log({ fields: fields, files: files });
    });

    // Use the filebegin event to save the file with the naming convention
    /*form.on('fileBegin', function (name, file) {
    file.path = localfilepath;
});*/

form.on('error', function (err) {
        if (err){
            response.status(500).send(err);
            return;
        }
    });

    // After the files have been saved to the temporary name
    // move them to the to teh correct file name
    form.on('end', function (fields,files) {
        // Temporary location of our uploaded file
        var temp_path = this.openedFiles[0].path;

        fs.move(temp_path , localfilepath,function (err){

            if (err) {
                response.status(500).send(err);
                return;
            }
            else {
                // Send back a sucessful response with the file name
                response.status(200).send(localfilepath);
                response.end();
            }
        });
    });

// Send back a sucessful response with the file name
//response.status(200).send(localfilepath);
//response.end();
}
}
app.get()方法使用来处理”MergeAll”请求的。这个方法实现了之前描述过的功能。
// Request to merge all of the file chunks into one file
app.get('*/api/CelerFTFileUpload/MergeAll*', function(request,response) {

    if (request.method === 'GET') {

        // Get the extension from the file name
        var extension =path.extname(request.param('filename'));

        // Get the base file name
        var baseFilename =path.basename(request.param('filename'), extension);

        var localFilePath =uploadpath + request.param('directoryname')+ '/' + baseFilename;

        // Check if all of the file chunks have be uploaded
        // Note we only wnat the files with a *.tmp extension
        var files =getfilesWithExtensionName(localFilePath, 'tmp')
        /*if (err) {
            response.status(500).send(err);
            return;
        }*/

        if (files.length !=request.param('numberOfChunks')){
            response.status(400).send('Number of file chunks less than total count');
            return;
        }

        var filename =localFilePath + '/'+ baseFilename +extension;
        var outputFile =fs.createWriteStream(filename);

        // Done writing the file
        // Move it to top level directory
        // and create MD5 hash
        outputFile.on('finish', function (){
            console.log('file has been written');
            // New name for the file
            var newfilename = uploadpath +request.param('directoryname')+ '/' + baseFilename
            + extension;

            // Check if file exists at top level if it does delete it
            //if (fs.ensureFileSync(newfilename)) {
            fs.removeSync(newfilename);
            //}

            // Move the file
            fs.move(filename, newfilename ,function (err) {
                if (err) {
                    response.status(500).send(err);
                    return;
                }
                else {
                    // Delete the temporary directory
                    fs.removeSync(localFilePath);
                    varhash = crypto.createHash('md5'),
                        hashstream = fs.createReadStream(newfilename);

                    hashstream.on('data', function (data) {
                        hash.update(data)
                    });

                    hashstream.on('end', function (){
                        var md5results =hash.digest('hex');
                        // Send back a sucessful response with the file name
                        response.status(200).send('Sucessfully merged file ' + filename + ", "
                        + md5results.toUpperCase());
                        response.end();
                    });
                }
            });
        });

        // Loop through the file chunks and write them to the file
        // files[index] retunrs the name of the file.
        // we need to add put in the full path to the file
        for (var index infiles) {
            console.log(files[index]);
            var data = fs.readFileSync(localFilePath +'/' +files[index]);
            outputFile.write(data);
            fs.removeSync(localFilePath + '/' + files[index]);
        }
        outputFile.end();
    }

})   ;
注意Node.js并没有提供String.padLeft()方法,这是通过扩展String实现的。
// String padding left code taken from
// http://www.lm-tech.it/Blog/post/2012/12/01/String-Padding-in-Javascript.aspx
String.prototype.padLeft = function (paddingChar, length) {
    var s = new String(this);
    if ((this.length< length)&& (paddingChar.toString().length > 0)) {
        for (var i = 0; i < (length - this.length) ; i++) {
            s = paddingChar.toString().charAt(0).concat(s);
        }
    }
    return s;
}   ;
一些其它事情
其中一件事是,发表上篇文章后我继续研究是为了通过域名碎片实现并行上传到CeleFT功能。域名碎片的原理是访问一个web站点时,让web浏览器建立更多的超过正常允许范围的并发连接。 域名碎片可以通过使用不同的域名(如web1.example.com,web2.example.com)或者不同的端口号(如8000, 8001)托管web站点的方式实现。
示例中,我们使用不同端口号托管web站点的方式。
我们使用 iisnode 把 Node.js集成到 IIS( Microsoft Internet Information Services)实现这一点。 下载兼容你操作系统的版本 iisnode (x86) 或者 iisnode (x64)。 下载 IIS URL重写包。
一旦安装完成(假定windows版Node.js已安装),到IIS管理器中创建6个新网站。将第一个网站命名为CelerFTJS并且将侦听端口配置为8000。

图片7在IIS管理器中创建一个新网站
然后创建其他的网站。我为每一个网站都创建了一个应用池,并且给应用池“LocalSystem”级别的权限。所有网站的本地路径是C:\inetpub\wwwroot\CelerFTNodeJS。
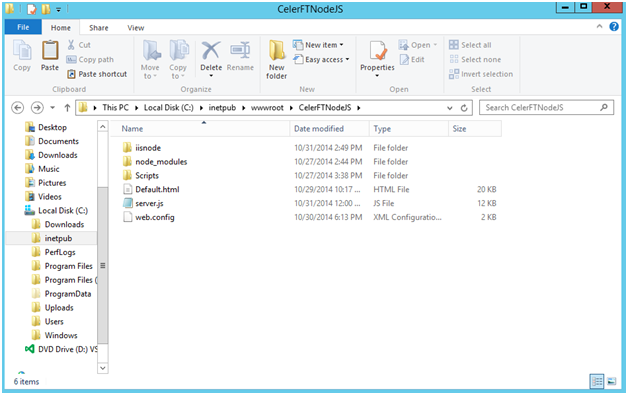
图片8 文件夹层级
我在Release模式下编译了Node.js应用,然后我拷贝了server.js文件、Script文件夹以及node_modules文件夹到那个目录下。
要让包含 iisnode 的Node.js的应用工作,我们需要创建一个web.config文件,并在其中添加如下得内容。
<defaultDocument>
    <files>
      <add value="server.js" />
    </files>
  </defaultDocument>

  <handlers>
    <!-- indicates that the server.js file is a node.js application to be handled by the
    iisnode module -->
    <add name="iisnode" path="*.js" verb="*" modules="iisnode" />
  </handlers>

  <rewrite>
    <rules>
      <rule name="CelerFTJS">
        <match url="/*" />
        <action type="Rewrite" url="server.js" />
      </rule>

      <!-- Don't interfere with requests for node-inspector debugging -->
      <rule name="NodeInspector" patternSyntax="ECMAScript" stopProcessing="true">
        <match url="^server.js\/debug[\/]?" />
      </rule>
    </rules>
  </rewrite>
web.config中各项的意思是让iisnode处理所有得*.js文件,由server.js 处理任何匹配”/*”的URL。
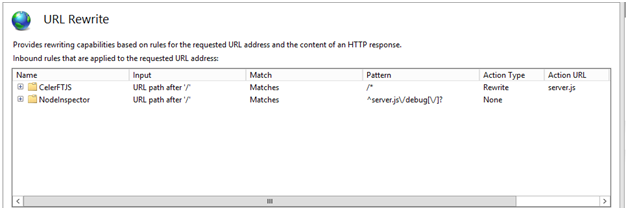
图片9 URL重写规则
如果你正确的做完了所有的工作,你就可以通过http://localhost:8000浏览网站,并进入CelerFT ”Default.html”页面。
web.config文件被修改以支持如前面post中所解释的大文件的上传,这里我不会解释所有的项。不过下面的web.config项可以改善 iisnode中Node.js的性能。
并行上传
为了使用域名碎片来实现并行上传,我不得不给Node.js应用做些修改。我第一个要修改的是让Node.js应用支持跨域资源共享。我不得不这样做是因为使用域碎片实际上是让一个请求分到不同的域并且同源策略会限制我的这个请求。
好消息是XMLttPRequest 标准2规范允许我这么做,如果网站已经把跨域资源共享打开,更好的是我不用为了实现这个而变更在”workeruploadchunk.js”里的上传方法。
// 使用跨域资源共享 // Taken from http://bannockburn.io/2013/09/cross-origin-resource-sharing-cors-with-a-node-js-express-js-and-sencha-touch-app/
var   enableCORS = function(request,response, next){
    response.header('Access-Control-Allow-Origin', '*');
    response.header('Access-Control-Allow-Methods', 'GET,POST,OPTIONS');
    response.header('Access-Control-Allow-Headers', 'Content-Type, Authorization, Content-
                    Length,    X-Requested-With'   )   ;

    // 拦截OPTIONS方法
    if ('OPTIONS' ==request.method){
        response.send(204);
    }
    else {
        next();
    }
}   ;

// 在表达式中使用跨域资源共享
app.   use   (   enableCORS   )   ;
为了使server.js文件中得CORS可用,我创建了一个函数,该函数会创建必要的头以表明Node.js应用支持CORS。另一件事是我还需要表明CORS支持两种请求,他们是:
- 简单请求:
1、只用GET,HEAD或POST。如果使用POST向服务器发送数据,那么发送给服务器的HTTP POST请求的Content-Type应是application/x-www-form-urlencoded, multipart/form-data, 或 text/plain其中的一个。
2、HTTP请求中不要设置自定义的头(例如X-Modified等)
- 预检请求:
1、使用GET,HEAD或POST以外的方法。假设使用POST发送请求,那么Content-Type不能是application/x-www-form-urlencoded, multipart/form-data, or text/plain,例如假设POST请求向服务器发送了XML有效载荷使用了application/xml or text/xml,那么这个请求就是预检的。
2、在请求中设置自定义头(比如请求使用X-PINGOTHER头)。
在我们的例子中,我们用的是简单请求,所以我们不需要做其他得工作以使例子能够工作。
在 ”workeruploadchunk.js” 文件中,我向 self.onmessage 事件添加了对进行并行文件数据块上传的支持.
// We are going to upload to a backend that supports parallel uploads.
// Parallel uploads is supported by publishng the web site on different ports
// The backen must implement CORS for this to work
else if(workerdata.chunk!= null&& workerdata.paralleluploads ==true){
    if (urlnumber >= 6) {
        urlnumber = 0;
    }

    if (urlcount >= 6) {
        urlcount = 0;
    }

    if (urlcount == 0) {
        uploadurl = workerdata.currentlocation +webapiUrl + urlnumber;
    }
    else {
        // Increment the port numbers, e.g 8000, 8001, 8002, 8003, 8004, 8005
        uploadurl = workerdata.currentlocation.slice(0, -1) + urlcount +webapiUrl +
        urlnumber;
    }

    upload(workerdata.chunk,workerdata.filename,workerdata.chunkCount, uploadurl,
    workerdata.asyncstate);
    urlcount++;
    urlnumber++;
  }
在 Default.html 页面我对当前的URL进行了保存,因为我准备把这些信息发送给文件上传的工作程序. 只所以这样做是因为:
- 我想要利用这个信息增加端口数量
- 做了 CORS 请求,我需要把完整的 URL 发送给 XMLHttpRequest 对象.
最后修改了 CelerFT 接口来支持并行上传.
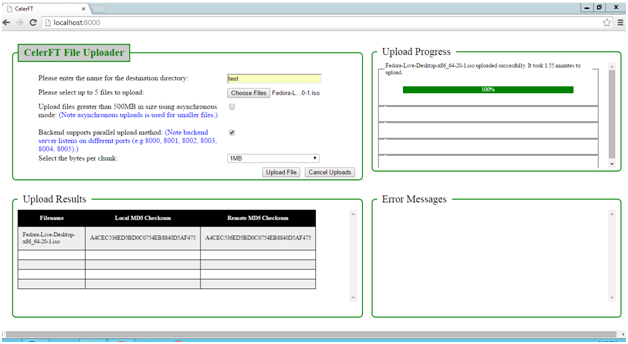
带有并行上传的CelerFT
哈尔滨品用软件有限公司致力于为哈尔滨的中小企业制作大气、美观的优秀网站,并且能够搭建符合百度排名规范的网站基底,使您的网站无需额外费用,即可稳步提升排名至首页。欢迎体验最佳的哈尔滨网站建设。
